about shop patterns projects printables extras sponsorship wild olive twitter flickr pinterest subscribe

project // magnetic felt frame (with flowers for mother's day!)

Felt Floral Magnetic Frame

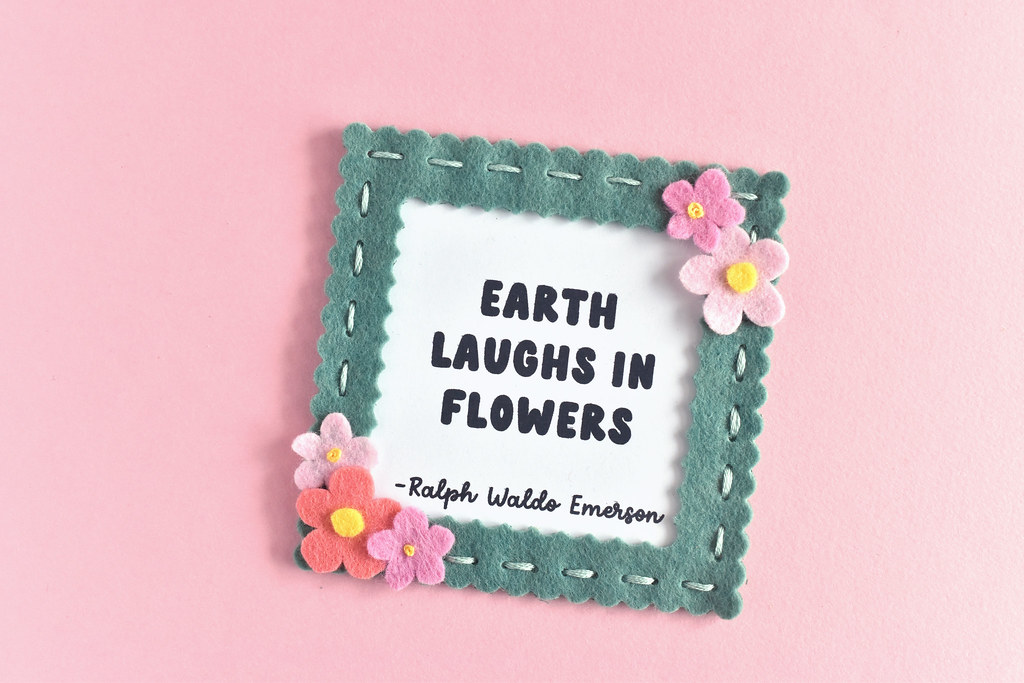
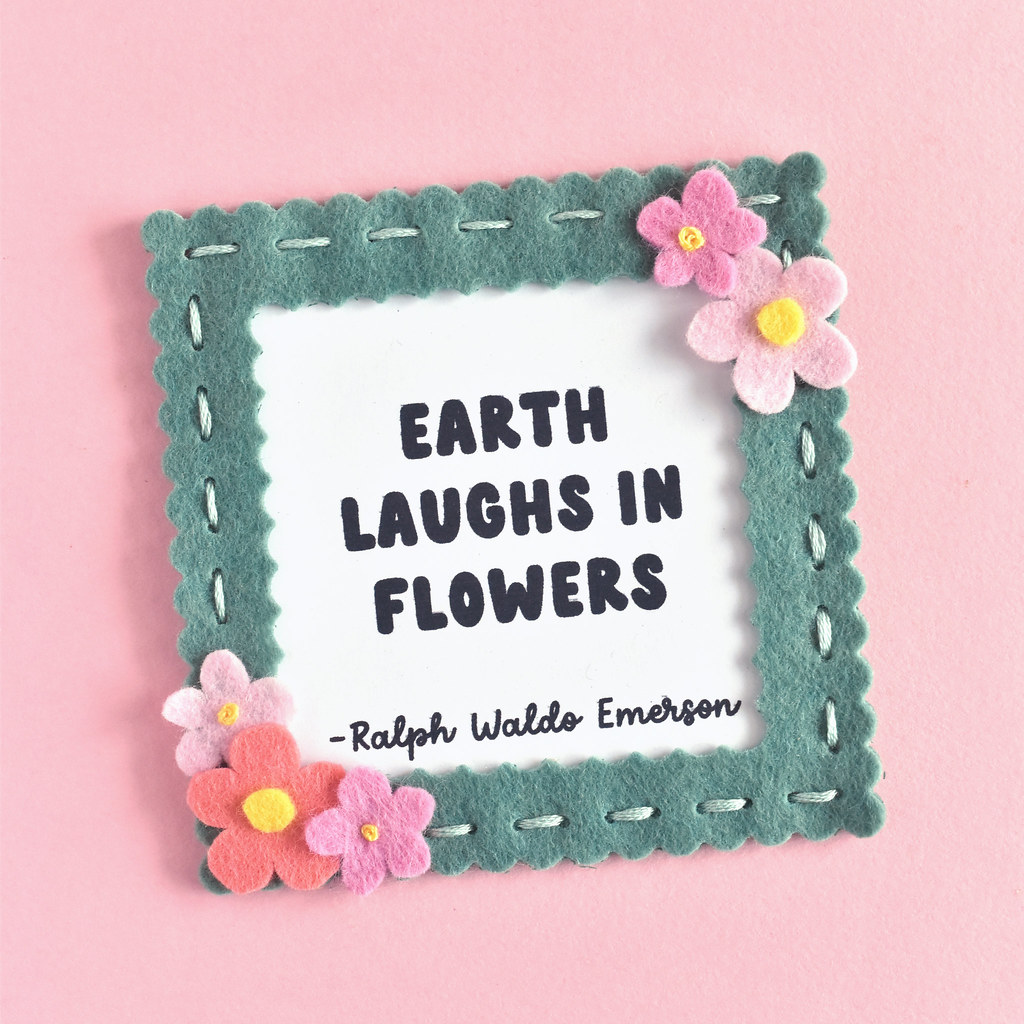
Want to make a sweet little frame for your mom this Mother's Day? This one is made from felt and has magnets so she can stick it on the refrigerator! I'm showing it here with a little poetry line, but you can add a photo or anything you'd like. It's especially good for a gift to give grandma with smiling grandkid faces inside. And they can help make the frame too!

I've had more felt crafts than usual around here lately, many of which use deep-etch dies from Benzie and a manual die cutting machine. But I've just really been having fun using them, and when I can find a new way to combine my favorite things, I go for it! This time around I'm using the Squares and Scallops set (affiliate link). And the flowers use a technique that I recently saw on Instagram, and just HAD to try out.

Are you ready to give this a try? Let's go!
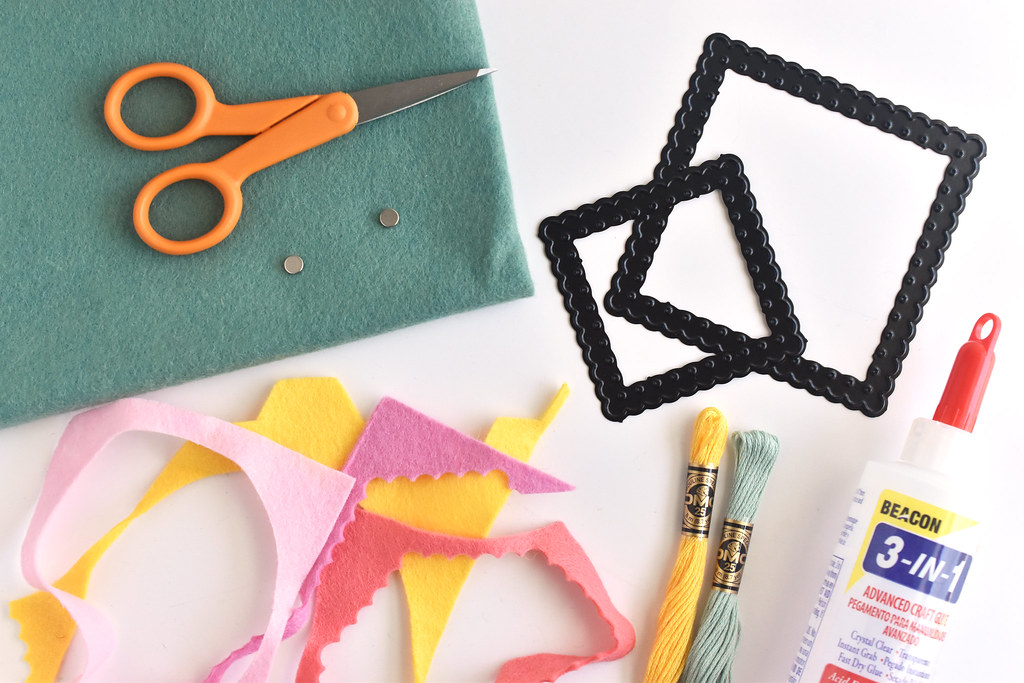
Felt Floral Magnetic Frame

You will need:

Felt for the frame (two squares a little larger than 4 inches)
Felt scraps for the flowers
Embroidery floss
Two small magnets (see note below)
Glue (Beacon 3-in-1 holds the magnets and the felt!)
Scissors
Needle
Coins
Vanishing ink pen
Squares and Scallops deep-etch die (affiliate link) and manual die cutting machine

About the Magnets: I used super strong neodymium magnets because they will hold through felt, while still remaining barely noticeable. HOWEVER, these are not child safe even a little. You may want to use different magnets and attach them to the back of the frame instead. Use your judgement!

Felt Floral Magnetic Frame

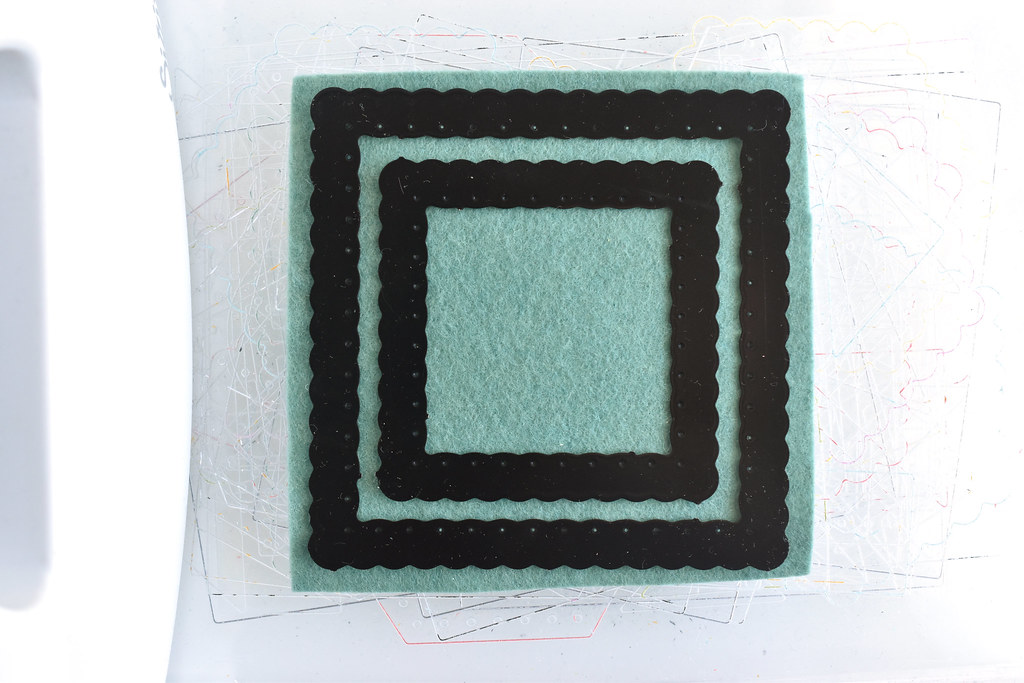
Use the two largest scallop squares to cut out the front of the frame. Center the smaller of the dies in the middle to make the opening.

Felt Floral Magnetic Frame

Use the largest scallop square to cut the back of the frame.

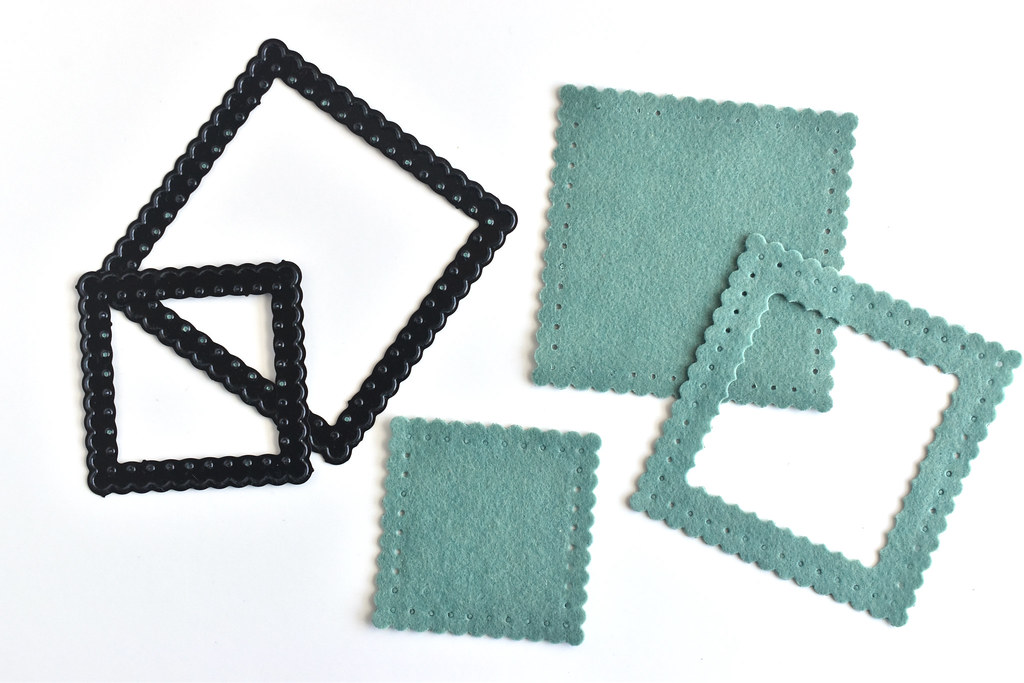
You'll end up with a large solid square and a large open square. You'll also have a smaller scallop square, which you can save for making another project (I'll definitely have more projects using these dies!).

Felt Floral Magnetic Frame

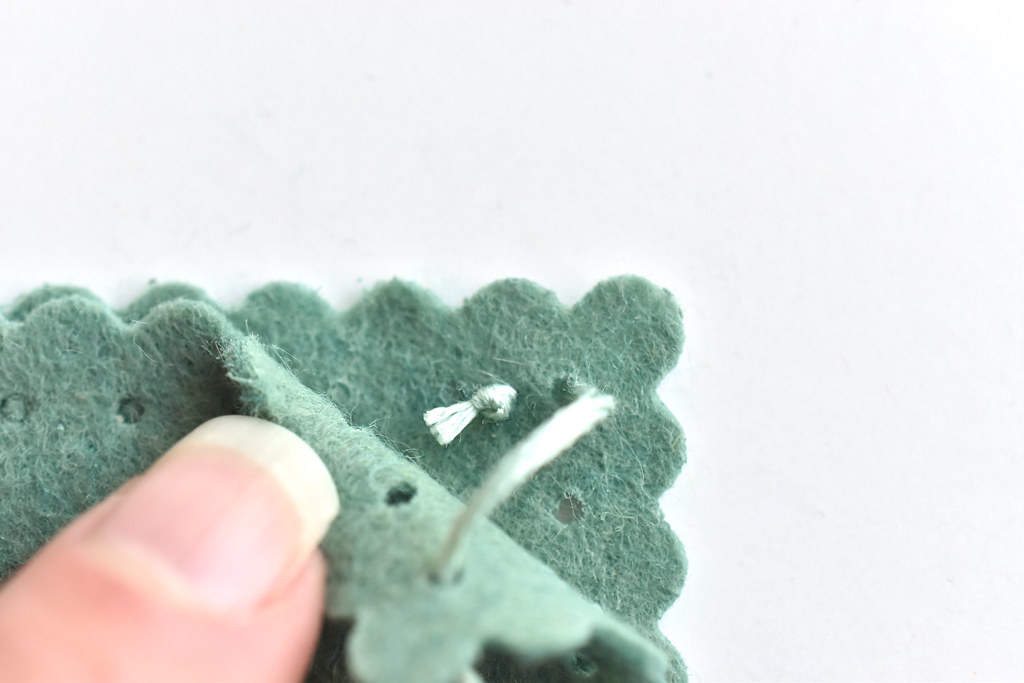
Thread a needle with six strands of embroidery floss and start it with a knot at the top corner as shown. You want to go through the felt on the back layer, and then up through both frame layers in the corner hole.

Felt Floral Magnetic Frame

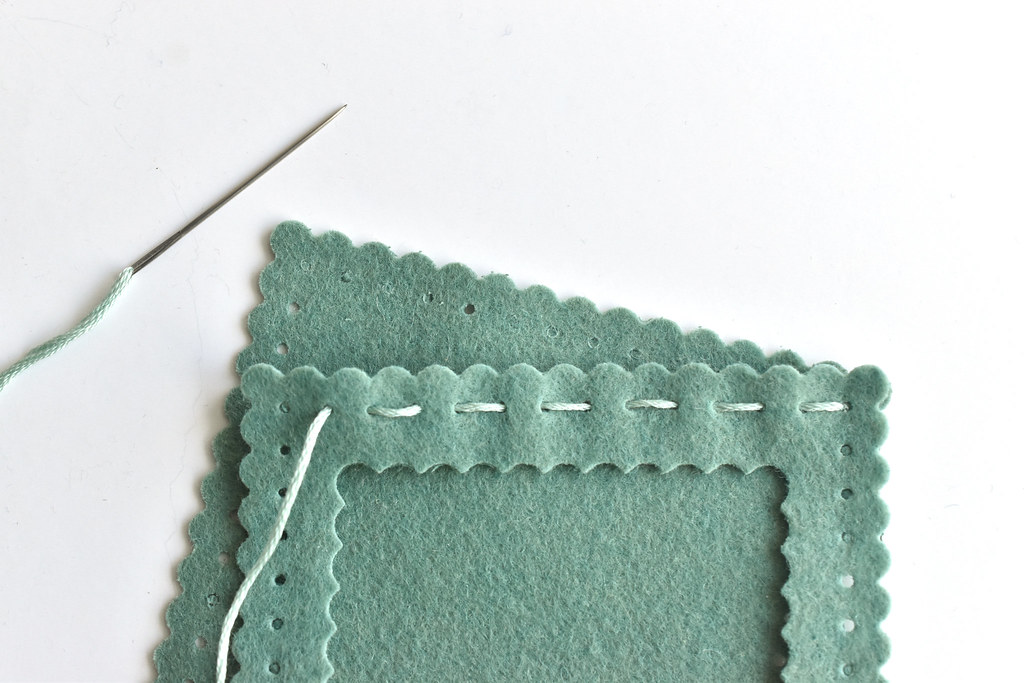
Stitch with running stitch across the top through ONLY the front layer. This will make all the edges look the same, while keeping the top open. Go through the front and back on the corner hole.

Felt Floral Magnetic Frame

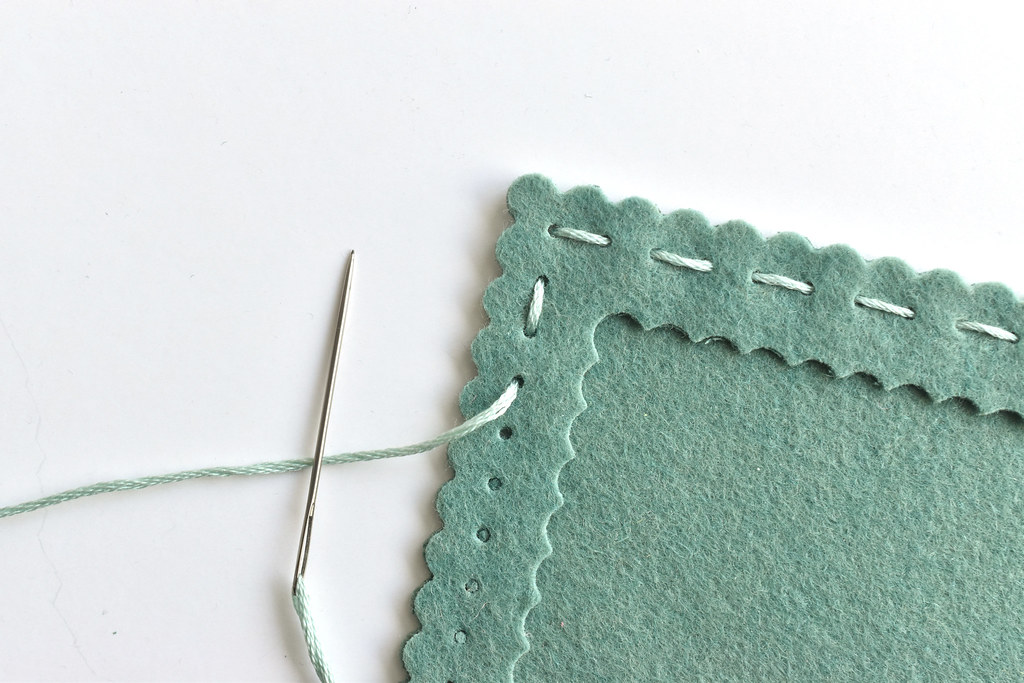
Continue stitching around the sides, but now you should stitch through the front and back at the same time.

When you reach the end, secure the thread with a knot hidden between the layers or on the back. You'll need to go through the felt and not just a hole, otherwise the stitching may come undone.

Felt Floral Magnetic Frame

To make the flowers, I used a method that I saw from DusiCrafts on Instagram. You should definitely go watch her video!

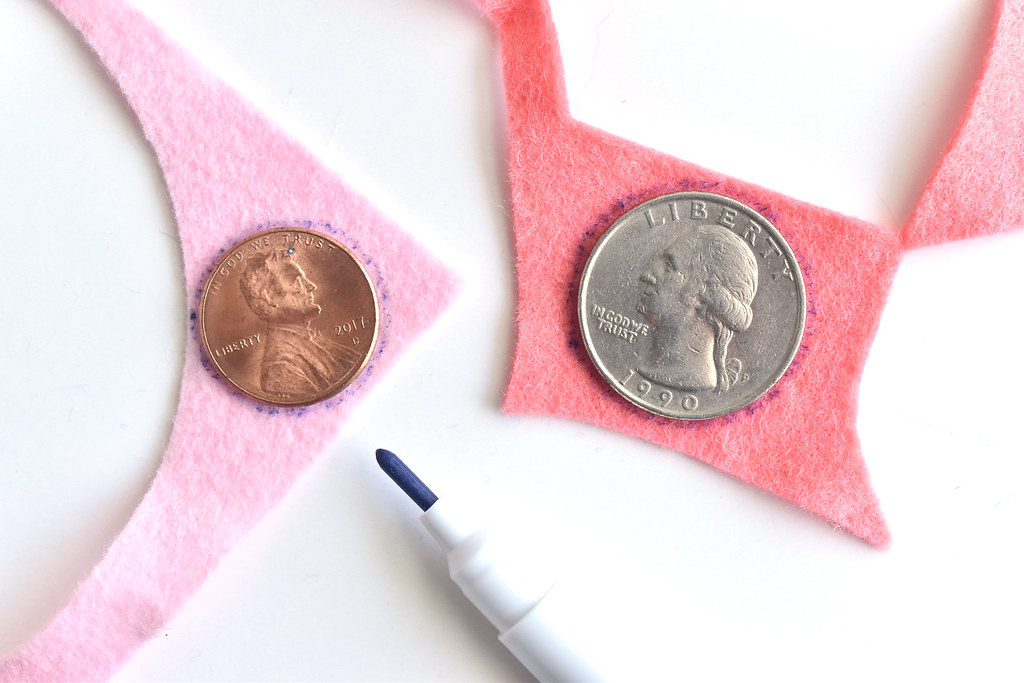
Instead of using templates, start by tracing a quarter and a penny onto your felt scraps. I made two large flowers and three small flowers.

Felt Floral Magnetic Frame

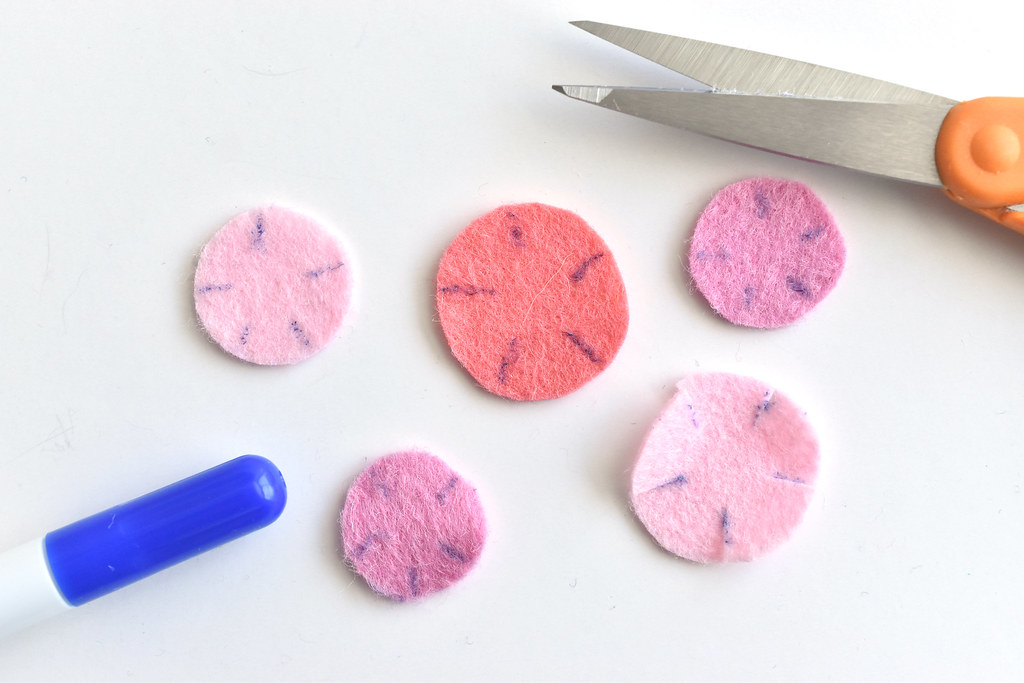
Cut out the circles and then mark five straight lines from the edges. You could do four or six if you'd rather! Snip the lines with your scissors.

Felt Floral Magnetic Frame

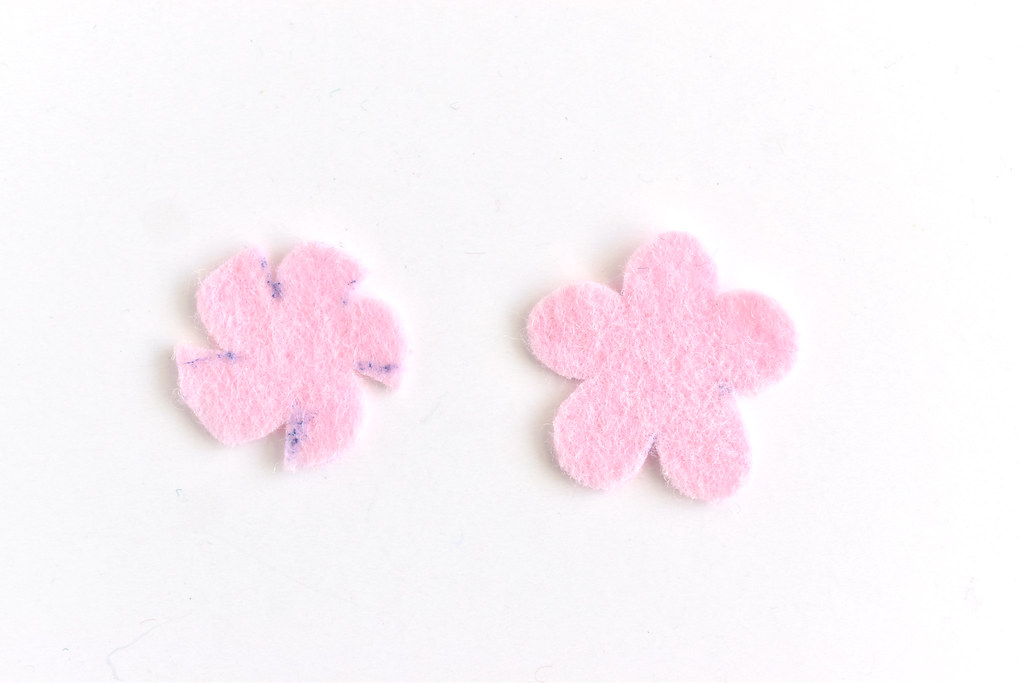
Where you snipped, you now have little tabs. Round those with your scissors, starting on one side, and then the other. Remove any remaining pattern markings.

Felt Floral Magnetic Frame

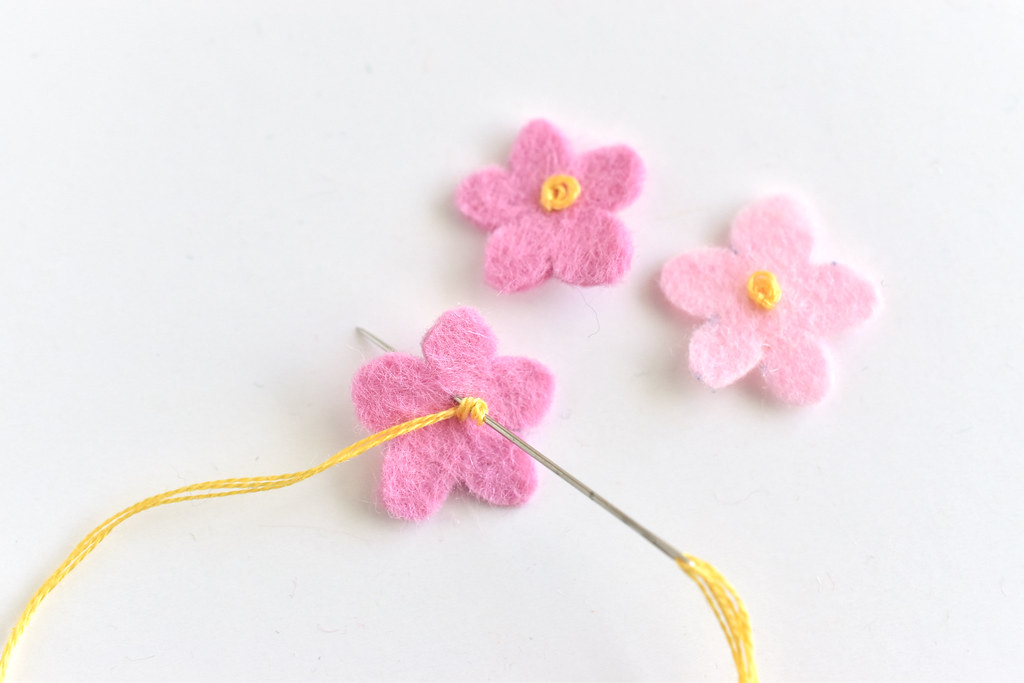
Embroider loose french knots in the middle of the small flowers. You can do several stitches in the middle of the larger flowers, or cut out tiny circles of felt like I did.

Felt Floral Magnetic Frame

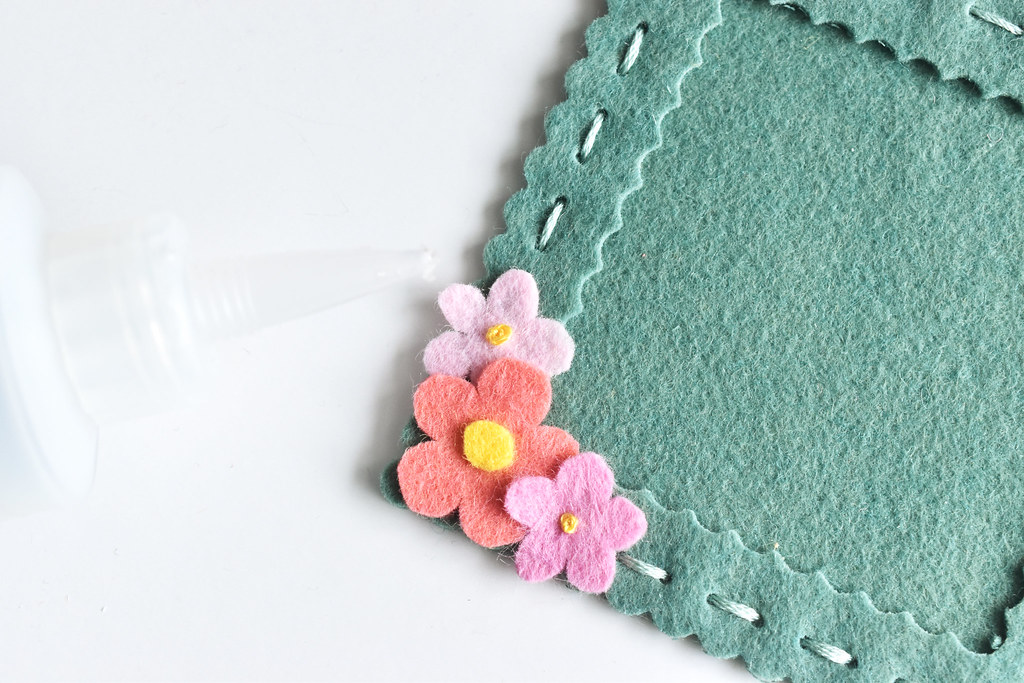
Glue the flowers to the edge of the frame.

Felt Floral Magnetic Frame

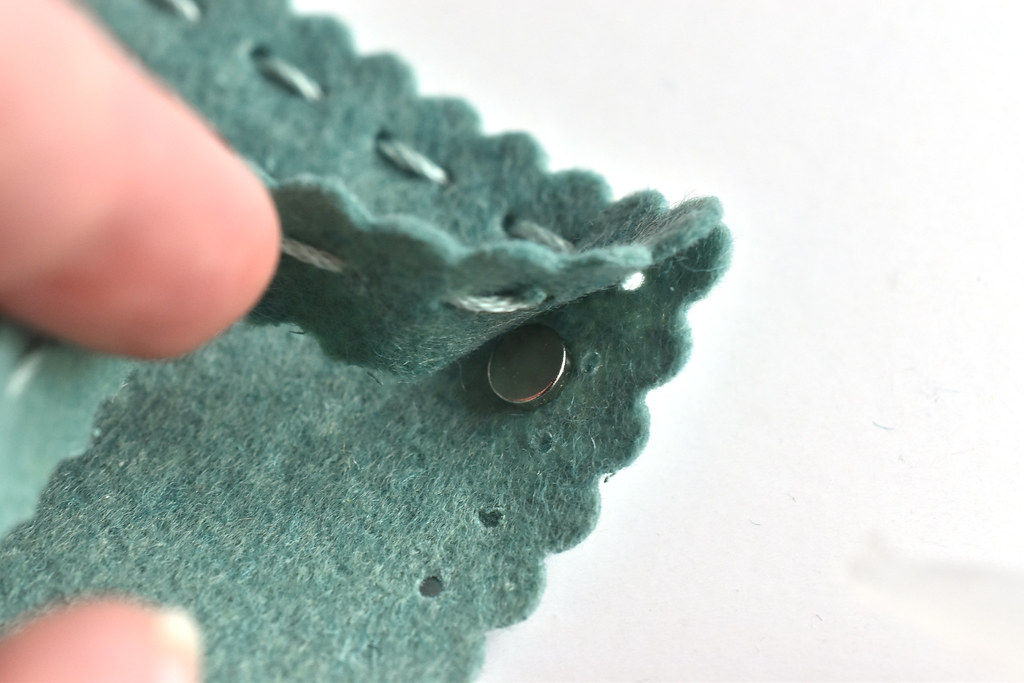
If you're using neodymium magnets you can glue them inside near the top edge of the frame. Otherwise, glue your magnets to the back of the frame.

Felt Floral Magnetic Frame

It's all ready to have a photo or a special message added to the frame!

Felt Floral Magnetic Frame 
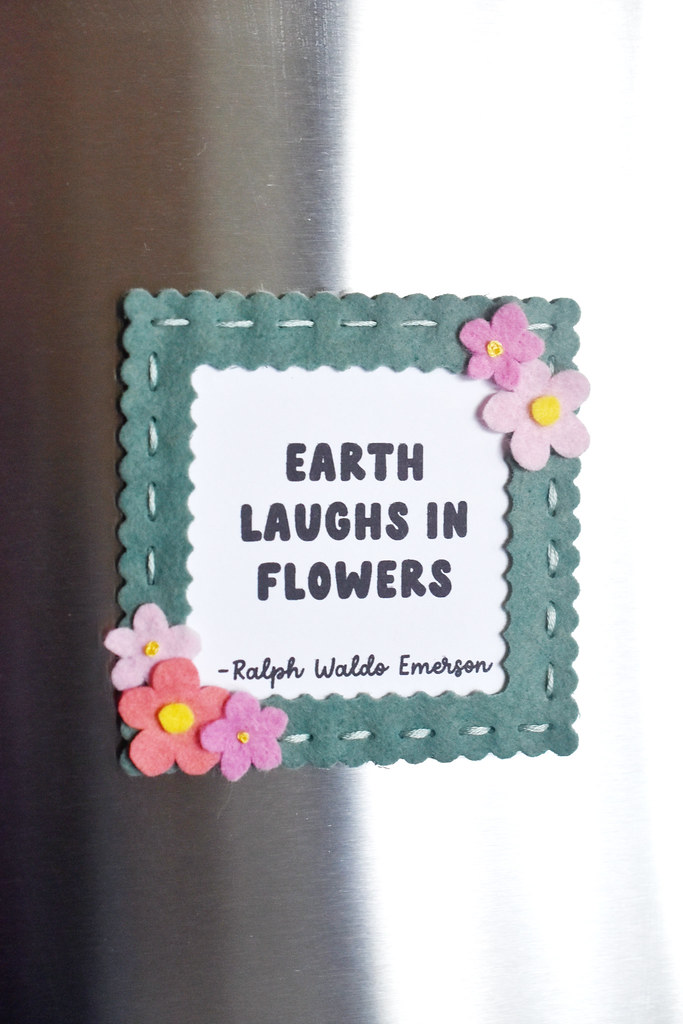
I decided to place a line of poetry in my frame for now. This is actually a printable I shared on my Ko-Fi page. It's designed to go with an embroidery and cross stitch pattern that my Ko-Fi Klatsch members received, but the little set of printables are available to anyone who supports me there (one time or as a subscriber!) When you're adding a photo or anything else to your frame, you'll just need to cut it down to 3 inches square.

Felt Floral Magnetic Frame

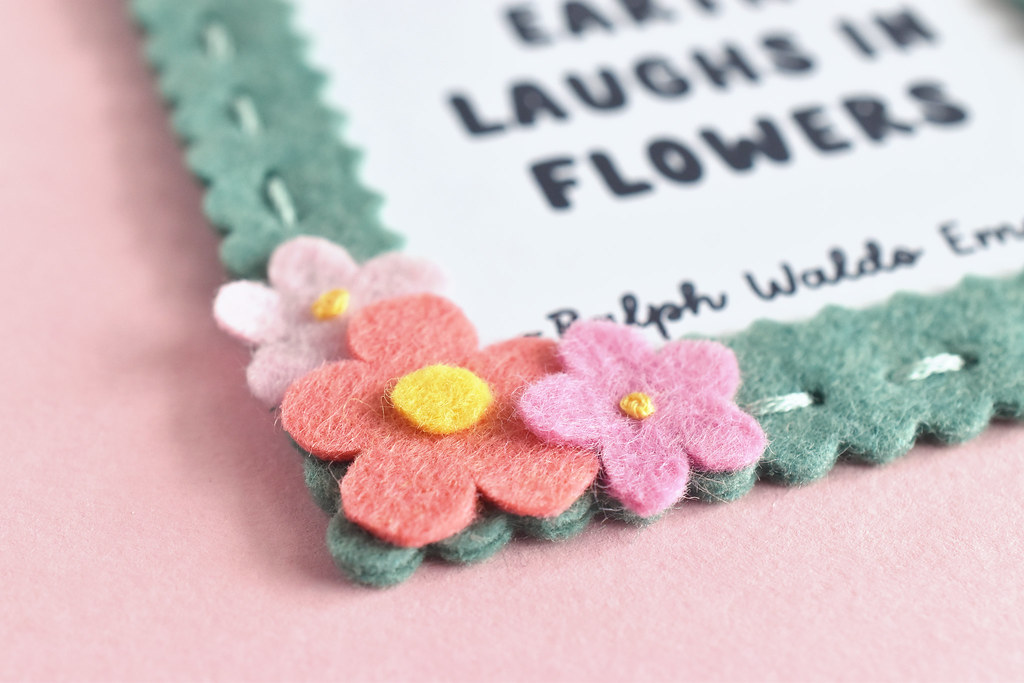
I just love the little flower details and that it's so easy to add something cute and special in the center. I also love the idea of a photo frame as a Mother's Day gift, and have made a magnetic frame in the past too. That one used English paper piecing. But even if you aren't a mom or aren't gifting this to someone, it's still a fun frame to make a use!

Don't want to make this magnetic? Add a little hanging so it's easy to display this on a wall!

project // quilt block hoop art

Quilt Block Hoop Art

This post contains affiliate links. I may receive compensation if you shop via this post.

Calling all fan of quilts and quilty things, even if you aren't a quilter. Today I'm showing you how to make a quilt block out of felt and fabric and then hang it up in an embroidery hoop for your wall. It's such a cute way to bring your love of this craft to your decor.

This project starts with inspiration from the felt quilt block ornaments I made last year, which then led to deep-etch dies from Benzie. But also this week I released two new sewing themed patterns: Sew Cute (a sewing machine embroidery pattern) and Sewing Bee (hexagon shaped ornaments with sewing tools). Quilt block hoop art feels like it rounds out the collection.

Quilt Block Hoop Art

Because this is entirely sewn by hand, it's a portable project. And unlike making an actual quilt, you don't have any seam allowances to fuss over. Just fit the pieces together!

One thing that makes this different from my felt ornaments (besides the size) is that I've added some print fabric in there. You don't have to do this for the center piece. Make it all felt if you'd like. OR add the fabric to all the pieces! You'll still need the felt to make applique easier and so there's no fraying. But it would be so cute this way!

Now, shall we jump in?

Quilt Block Hoop Art

Here's what you need:

Wool or wool blend felt in several colors (I used Swan, Fern, and white from Benzie)
Jeanette's Cozy Quilt Block deep-etch dies and manual cutting machine (optional)
Fabric for the backing (I used Essex Yarn Dyed Classic Wovens in Gingham Mustard)
Fabric for the quilt block (I used Quilt Town Missouri Star Small Floral)
Fusible web
Embroidery floss
Embroidery hoop
Iron
Needle
Scissors

The fabrics I used were courtesy of Missouri Star Quilt Co. You can save 20% on orders of $50 or more when you use my MSQC Partner link! Valid on most items through April 30, 2024 (and probably beyond!)

Quilt Block Hoop Art

First, you're going to need to fuse the fabric to the felt. For the center, I used a piece that's a little larger than 2 inches square.

Quilt Block Hoop Art

Next, cut out all the pieces.

I used the deep-etch die to make this fast and accurate. I needed to do two runs through my die cutter for the pieces where you see a second piece of felt. It was so great being able to cut the felt and fabric fused piece with the die cutter too. So easy!

If you don't want to use the dies, here's what you'll need to cut:

one 2x2 inch square
four 1x1 inch squares
four 1x1 inch squares cut into eight half-square triangles
two 1-2/5 inch squares cut into four half-square triangles

Quilt Block Hoop Art

Arrange all the pieces to make sure they fit.

Quilt Block Hoop Art

Embroider a face on the center square if you'd like. I just added my signature smile!

Quilt Block Hoop Art

Next, place the backing fabric in an embroidery hoop and start placing the pieces where you want them. I used the gingham as a guide for placement and eventually for stitching.

Quilt Block Hoop Art

Stitch each piece in place with two strands of embroidery floss and whip stitch. Come up through the backing fabric and down close to the edge of the felt pieces.

Quilt Block Hoop Art

After you stitch the center square, add the small triangles. Align them to the corners of the center square. There will be a small gap where they meet on the side of the square, but that's okay.

Quilt Block Hoop Art

Add the small squares and large triangles last. They should fit in the open spaces just right!

Quilt Block Hoop Art

Now you can finish off the edges of the fabric and bring them to the back of the hoop. Or use this to make something else, like a pillow!

Quilt Block Hoop Art

I love its happy little face and the texture that felt applique brings. You want to reach out and touch it!

Quilt Block Hoop Art

The colors and fabric combination I used for this are a little different than what I would usually do, but I happened to see them together and loved them. And that's another great thing about a small project like this. It's a perfect place to try out something you haven't before. If you like something more unusual, but don't want to commit to a whole quilt, make a mini one for your wall in a single evening!

Happy stitching!

project // simple scissors sheath

Simple Scissors Sheath

Do you make sure to keep the blades of your sewing and embroidery scissors safe from harm? A simple sheath protects the scissors, along with your stitching (project bags get crowded sometimes!) or even your toes. Yes, those points do hurt when they fall to your feet. Today I'll show you how to make these fast and easy sheaths that keep your scissors in great shape while they look cute too!

This pattern and tutorial have two sizes and shapes for two new pairs of scissors that I have. Larger shears, and smaller, precision scissors. And while a sheath is usually just something to cover the blade, this has the scissors sliding in so it's more sheath like, and less pouch like. Call it what you will!

Simple Scissors Sheath

I LOVE these scissors. I love most scissors, but when I got my first pair of these little babies, I was smitten. They are simple and cute, but more importantly, they cut like a dream. I HAD to have all the colors. (Sadly, at the time of writing, they are temporarily sold out at Missouri Star Quilt Co., where mine came from).

Simple Scissors Sheath

But this is what happens when you drop your enamel-painted scissors. You see, I tend to carry my work around the house with me and sometimes even when I'm just sitting there working, I drop my scissors. A lot. Multiple times a week. And I've damaged several pair this way.

So I'm hoping to get better about keeping them in a sheath or a little case to minimize this problem of mine.

Simple Scissors Sheath

This project expanded when Missouri Star Quilt Co. sent me their 8" Everyday Scissors (affiliate link). And I'm so glad they did! First, it meant I got to make another scissor sheath (technically, I didn't need to...they come with a plastic sheath and a plastic pouch). But they also made cutting out the layers of felt and fabric for this project a lot easier.

While I may not carry these scissors around the house with me the same way I do with those I use for embroidery and hand sewing, I like having them look cute. I went full Missouri Star and used their Quilt Town fabric line, which has their logo and everything.

If you'd like to make a simple scissors sheath, maybe for the MSQC Everyday Scissors or other shears (including pinking or scallop shears!), read on! And I've got the pattern for the smaller sheath too!

Simple Scissors Sheath

Here's what you need:

Fabric (two 10x10 inch squares for the large sheath or two 7x7 inch squares for the small sheath)
Wool or wool blend felt (10x10 inch for large or 7x7 inch for small)
Fusible web (10x10 inch for large or 7x7 inch for small)
Ribbon (optional - I used the ribbon from my fat quarter bundle)
Embroidery floss
Iron and ironing mat
Pencil
Scissors
Chenille needle

DOWNLOAD THE SCISSOR SHEATH PATTERN PDF

The Quilt Town fabric and the Everyday Scissors both were courtesy of Missouri Star Quilt Co. I'm an MSQC partner, which means you can save 20% on most items for purchases over $50 through April 30, 2024 when you shop using this link. (Bonus: using my link also helps support the work I do!)

Simple Scissors Sheath

First, you need to layer the materials as follows:

Fabric wrong side up
Fusible web
Felt
Fusible web
Fabric right side up

Simple Scissors Sheath

Iron the layers to fuse the fabric to the felt. You'll need to iron the fabric on both sides.

Simple Scissors Sheath

Fold the fused piece in half, with whichever side you want showing on the outside of your sheath.

Simple Scissors Sheath

Cut out the template and place the long straight edge on the fold. Trace the other sides with a pencil.

Simple Scissors Sheath

Cut out the sheath. The Everyday Scissors cut through all these layers with ease!

By the way, the process for both sheath sizes is exactly the same. On the size/shape is different. Er...except for the ribbon in the next two steps, which I left off of the smaller sheath.

Simple Scissors Sheath

Cut a small piece of ribbon and fold it in half. Because my fat quarter pack came with this adorable printed ribbon, I HAD to use it here.

Simple Scissors Sheath

Place the ribbon between the layers. I put mine on the side close to the end that will remain open. The ribbon tab is completely optional, but I thought it was cute.

Simple Scissors Sheath

Stitch along the edge with running stitch, using all six strands of embroidery floss for a nice bold look.

After I stitched my first sheath, I realized that I probably should have added some stitching to the open edge. I went back and did that after I was finished, and I'm glad I did. When I made the second one, I stitched the straight edge that ends up being the opening first, then I stitched the other sides together.

Simple Scissors Sheath

And that's it! I love that the insides of these also have a cute print, and the fabric makes it less likely that the really pointy scissors won't poke the felt.

If you want to, you can also add a snap to prevent the scissors from sliding out. We'll see how I do with mine and if I think I need the snap.

Simple Scissors Sheath

Really I'm just hoping that my new little enamel-handles stay safe and happy now.

Simple Scissors Sheath

At the very least I'm happy seeing these in their lovely fabric homes!

project // disney snacks mickey pretzel felt ornament

Mickey Pretzel Felt Ornament

I'm not sure why, but soft pretzels shaped like Mickey Mouse just taste better. And if I'm turning iconic Disney snacks into felt ornaments, a Mickey pretzel was a must!

Now, this one looks a little different than the actual pretzels, which you can see below. But believe me when I tell you that it looked SUPER weird when I was trying to make this match. In fact, even Disney themselves changed the look when they released the pretzel items in their Disney Snacks merch line earlier this year.

Take a look at the comparison and tell me that this is still a Mickey Pretzel. Right?

Mickey Pretzel Felt Ornament

These photos tell a story. It starts with me deciding that I wanted a picture of a Mickey pretzel in front of the Pixar Pal-A-Round, formerly Mickey's Fun Wheel. But there aren't a lot of places that have Mickey prezels at Disney California Adventure. So I took a photo near the Animation Academy (close to where I got my pretzel!). But then I decided that my favorite wall in all of Disneyland was RIGHT there, so this was a good place for a photoshoot. You know...me in my ears...enjoying a pretzel with ears.

We then hike over to get the photo with Mickey in the background and my sister gasps! "You actually took a bite? But what about your photo?!?" And I told her that it was just as authentic this way. And it tasted great too!

Mickey Pretzel Felt Ornament

Now here's the scoop on making this ornament. Each ornament in this series goes together the same way, which is pretty much the same as much other felt applique ornaments. This one is just easier. You can watch my YouTube video showing an ornament from start to finish. (It's a different pattern, but you'll get the idea!).

This design has just one piece for the pretzel itself and then a bunch of french knots for the salt. You've gotta have the salt.

I used wool blend felt from Benzie Design (affiliate link). I cut the circles with my Circles and Scallops die, also from them, but you can use the circle templates in the PDF with plain or decorative scissors if you'd like.

I used freezer paper to cut the pretzel shape and carefully cut out the center sections.

You can embroider the details through the paper before carefully tearing it away, but it's actually easier for this one to remove the freezer paper and freehand the stitching. You can also use seed beads for the salt if you'd prefer!

Next, I stitched the pretzel down to the front circle with a tiny whip stitch and two strands of embroidery floss.

To assemble the ornament I used running stitch around the edges, then I filled in with a second round of running stitch. This is technically holbein stitch and it looks the same on the front and back.

Then I just used embroidery floss to make a little hanger. Other than the salt french knots, this is a fast one to make and perfect for any Disney Snack fan. Of course, now I'm wondering if I should have added a little cup of "plastic cheese"!